Visual Studio – It is a web based tool. It is an integrated development environment. It is basically used for executing and running the software program.
You will easily modify, create and execute the programs on this platform. Visual Studio supports Python, C++, JavaScript and many more languages. As per the sources it has the ability to support 36 languages which helps in the development of the new software.
Install Microsoft Visual Studio in Windows 11
To download and install Microsoft Visual Studio community – Follow the steps in a given manner:-
- Open the Web browser in your device
- Search on the official website https://www.visualstudio.com/downloads
- There are three types of the IDE available on the home page of the official website. Choose any of the IDE like Community, Professional and Enterprise edition. Professional and enterprise editions provide the 90 days free access facility.
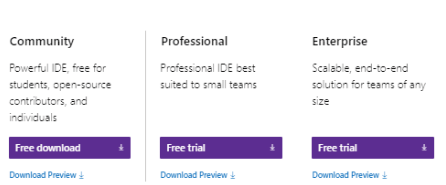
- To work on the software development model – It is the best for you to use the Professional IDE. It offers you the 90 days free trial features.
- Click on the Professional download link
- It will start downloading on your device, take a few minutes and download on your screen.
- Press and open the download .exe file on your device recently downloaded
- A security warning dialog box appear on your screen
- Click on the RUN option
- Click on the Continue option
- The initial files start downloading
- Click on the Install option- it will start downloading on your device
- Choose the .NET desktop development option
- Click on the install option
- Now, your Visual studio successfully downloads on your device.
- Now, you need to launch on the desktop screen
- While installing the first step display you some of the themes, select any of the themes you want to view
- Click on the Start Visual studio option
- Click on the New Project option it will ask you what type of the project you want to work on it
- Click on the Next option
- Click on the Console app option
- Click on the next button, the next page will allow you the Configuration information
- Give the name to the new project, add the location where you want to launch it and add the solution name
- It will help you to launch the new project.